Furnished By Hand

Hand-craft Tools for DIY Home Decor Projects

carpentry workshop
Most home decor crafting projects require a fixed location, heavy and cumbersome equipment, different accessories, electricity and the list goes on.
Waiting for the 'right-time' and place to finish a project can be quite frustrating, and this can lead to projects getting left in the 'to be finished at some point' pile.
On the other hand, there are home decor hand-crafts that are completely under your control, and can be done indoors or outdoors, in a plane or on a train.  These crafts include, knitting, crocheting and hand-stitching.  When using these hand-crafts, your projects are not affected by 'directives',  power failure,  other people or weather.  Hand-stitching especially,  can help to alleviate the boredom, while giving your home furnishings a completely fresh new look.  

With this in mind, It will come as no surprise that many of our hand-crafted home decor projects rely heavily on hand-stitching, for both construction and embellishments.  We are going to discuss hand-craft tools for home decor projects, that you can use in your craft-space and while out on adventures.

Piece Work

Hand-crafting home furnishings on the go is best suited to pattern pieces that have already been cut to size and shape, and then pinned or clipped together.  The type of Pieces that you can work with while On the Go include:
Stitching a zip into a recessed closure,
hidden zipper pocket
Attaching inner lining to cover fabric
lining fabric and main fabric
Stitching individual cushion panels together
blue and taupe suede cushion panels
Thread-painting, hand-embroidery, applique
red lips embroidery on white fabric
Everyone Can Do It
It's easy to be a smart handmade home decor expert, the key is to be ready to utilise all of your available time to complete your projects. Having everything you need to hand and ready to go, will ensure you complete more of your projects on time.

Hand-Craft Home Decor While On the Go

The great thing about hand-stitching your own home decor furnishings, is that you'll require very little space and equipment to get the job done.  There are fewer tools to work with and fewer items to misplace. Even if your tools do get damaged or lost,  all of the tools are VERY easy and affordable to replace.
Actually, that's one of the best things about it. If something breaks, chances are you can find a new one very quickly and with comparatively low cost. On the Go Home Decor tools include:
My favourite piece of hand-crafting kit is my Handmade Threaded Neede wallet. Life in general feels great when:
a) I know where my Threaded-Needle wallet is located
b) The needle wallet is full of threaded needles, ready for me to move my home decor project to the next level.

You can make your own Threaded needle wallet or modify a piece of equipment to suit your needs.
threaded needle wallet
Some hand-stitchers prefer to thread their needles using a magnifying glass.
monocle on a black case
The thread-end and needle eye appear larger and make threading the needle easier.


You can also use a monocle to view your stitches more closely and in-turn, achieve more, uniform, professional stitches.

Strong Magnets to Keep Pins, Skewers and Needles

It was AFTER I'd accidentally left a pin on a cushion, that I realised the beauty of a strong magnet and the need for me to always keep one handy.  Let's just say the first thing that I did post that rather rude awakening, was to invest in a set of very strong magnets for my clean-up routine.
After sewing, I sweep my large magnets over every inch of my work surfaces and the surrounding areas, to pick up any stray pins and needles.

I also use the magnets as a third hand to hold and steady my needles when threading them.
magnets

Craft Room Prep Tools and Activities

While brainstorming your home decor designs and hand-stitching your creations can both be done in various locations and at anytime, there are some stages of your projects that can't be done any where, other than in a dedicated craft space.
Your dedicated craft space is where you'll do ALL of your prep and finishing work. We call it 'dedicated' because it's a space used exclusively to store all of your tools, including safety and cleaning equipment (it is not for anyone to store their golf clubs. goal nets or any other such unrelated stuff in).  

There are plenty of different tools that will prove useful and make your DIY upholstery and home decor projects easier to manage. Lets look at some of those tools and the activities that they'll be used for.

Measurements

'To discover the exact size or amount of something'.
Eye-balling measurements is a great skill to master.
However there are times when it's absolutely essential for you to take very accurate measurements for DIY upholstery projects and there are a number of ways that you can do this.
Now let's take a look at some of the measuring tools and methods here:
Measuring Tape
measuring tape
Yard Stick
yard stick
Piece of String
rope or strong
Sticky Tape
sticky tape

Measurements with Maths

Home decor Fabric is purchased in yards or metres squared.  When buying project fabric, you'll be asked to provide the number of yards or metres that you require.  For this stage, you'll definitely need to use a tool to physically measure the width and height of your project,  along with an extra amount (yardage) to account for hems, seams and mistakes.  Which ever method you use, the aim is to be accurate and make calculations where necessary.

Measuring Tape

A pocket measuring tape is a strip of flexible plastic, metal or fibre-glass with markings at regular intervals. It's used to measure the length and width of an object. 
measuring tape
The tape is placed at one end of an object and extended over the area you wish to measure.  The tape is housed in a little plastic pod. It's pulled out of the pod when in use, and rolls back inside afterwards

Yard Stick

This is 'a straight edge used to physically measure lengths of up to one yard high'.
yard stick
A yard stick is a thin length of flat wood, plastic or metal, that has markings or notches at regular intervals.
Similar to a pocket measuring tape, the end of the yard stick is placed at one end of the object and the length of the stick is placed along the item you wish to measure.

Laser Measure

A laser measure (also called a digital measuring tape), is a great way to take measurements, store them and share them via Bluetooth, WIFI, 3G or 4G connections.
Lets say you want to make a set of palatial mansion-style curtains, you'll need more than one pair of hands to take height and width measurements of the area and the fabric.
A laser measure is a very handy electronic tool to have for this task. You simply hold the device at one end and point the laser (a red dot) in the direction you want to measure. The reading is displayed on an LCD screen. Distances of over 100 metres can be measured.
digital measure

Digital Calipers

digital calipers
When you need to take very precise measurements for your home decor project, a set of Digital Calipers are useful for small and awkward to measure areas. A set of digital calipers can take measurements ranging from zero to six inches.
The measurements, which are displayed on an LCD screen, can be converted into the required units including metric, inch and fractions.

Measurements without Maths

Sticky Tape

The sticky tape method is most useful for determining the size of hems and seam allowances, and also for use as a guideline for creating uniform stitches.
A piece of sticky tape is placed along the inside of the 'raw' edge of the decor fabric. As the width of sticky tape is constant, you can be sure that your hems and seams will be accurate and measure exactly the same depth throughout.
green sticky tape

String

A piece of string can be used along with a measuring tool to measure the perimeter of an item.
ball of string
The string method is very useful for measuring curved and spherical objects. First, wrap the string around the item and make a mark on the string to show where each end of the string should meet.
Lay the string along a ruler, yard stick or measuring tape and pull the string taut. Take note of the number on the measuring tool that sits closest to the mark on the piece of string.

Handmade Home Decor Design and Creation

Computer/Smart Phone and Printer

We're so lucky to have access to millions of unique and creative minds through the internet.
design pc
It's a wonderful place to find home decor inspiration and gather ideas. You can modify designs or combine them and create customised concepts.
You can print off your designs and develop a design portfolio of home decor ideas and use this as part of your Home Decor Project Planning Calendar.

Design Templates for Upholstery and Home Decor Furnishings

Every pattern piece needs to be accurately fashioned into shape, using either a sharp rotary cutter, a pair of scissors or craft blades.  To keep your designs consistent across your home decor projects, it's important to use templates and stencils. These can be created using various materials, for example Mylar. 
Mylar is a brand of stretched polyester film. It has superb tensile strength and can be used to create elegant text and graphics designs on fabric.
lit candle template

Mylar has several favourable qualities including:

durable and reusable
able to hold intricate and elaborate designs
transparent and reflective
pliable and tear-proof
resistant to solvents
The plastic is formed into flat shapes like perfect circles, squares, rectangles and ovals. The shapes can be used to create pattern pieces for bespoke cushion covers.
You can simply lay the template down on top of your fabric, trace around , cut out the shape and sew the pieces together.

The preparation for this needs to be done in a dedicated space and there are a number of good reasons why. Let's go through some of them here.
Mylar plastic shapes

Protect Your Good Quality Fabric

good quality fabric
Decor textiles are usually thicker than dress fabrics and many of them are reinforced on the reverse side of the fabric.

Kick-back from cutting through thick material can cause the blade to 'jump' or swerve off course and ruin the fabric. That's an awful waste of good fabric.

Shaping the fabric accurately requires patience, a steady hand and a flat, even surface.

Strong and Balanced Cutting Platform

Smooth Even Platform for Using Shears and Scissors
Scissors and Shears have inward facing blades and don't require a self healing mat to protect the cutting surface.

What you do need is a flat, even platform to balance the weight bearing arm of your scissors, while cutting and shaping your decor fabric.

Without a stable surface to balance your scissor arm on, it'll be very difficult to achieve smooth, uniform scissor strokes.

Protect the Fabric Cutting Platform

Fabric cutting with a craft blade or rotary cutter will damage even the most hard-wearing surface.

A self healing cutting mat (placed on a sturdy, stable platform) is an essential piece of equipment for your craft space
self healing mat

Ironing Upholstery and Home Decor Fabric

A sturdy iron is an invaluable tool for DIY Decor Stitchery. Clean, straight seams and hems give Fabric Decor a professional appearance.
iron and ironing board
A good iron is an essential for tasks that involve narrow spaces, like flattening fabric between the piping and seat cushion box border. A good quality  mini iron will give more control, where a larger iron would skim over the area, leaving untidy ripples in the fabric.

When pressing decor fabric, it is good practise to  always use a clean, good quality iron, a heat resistant, solid (padded) ironing surface and a clean Teflon press cloth.

Pinning and Clipping

I developed this idea after years of watching my sister create custom designs for herself (she is a devout collector of Vogue Magazine).
I admired the way she'd plan the design, create the pattern, cut and pin the fabric together, and then wrap the entire unmade garment in tissue paper - to be completed at a later date.
In under 30 minutes, she could machine sew a brand new, custom made outfit for any occasion.  It probably felt empowering to know that she'd never bump into her 'fashion doppelganger' at a party.

Pinning or clipping your decor fabric pieces together during planning and prep, allows you to pick up your project and sew on the go, whenever you're ready.
vogue
Stitching your decor fabric pieces together can really help to alleviate boredom while for example, sitting in on a conference call, on the train or in back to back traffic.  Where ever you are, you can be sure that at least one of your projects is in progress and on track.  You are in control.

Gluing

high strength glue in tubes
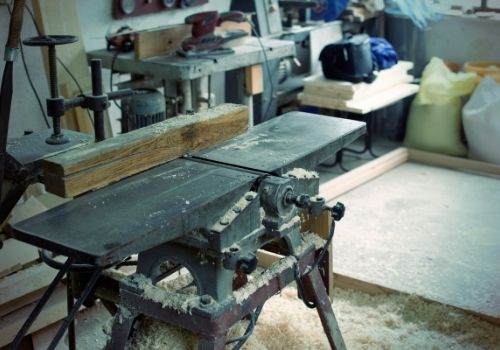
To keep your project clean, it's important that the messy stages are done in a dedicated space.
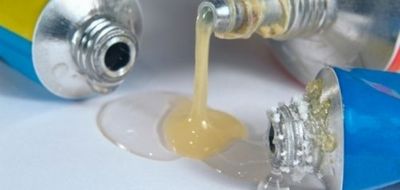
All gluing, whether it's with a hot glue gun or with a dry glue stick, should be done in your craft room on a flat, clean surface. All glue residue on tools and surfaces should be cleaned thoroughly afterwards.

Stapling

Whether you use a manual stapler or an air stapler with an air compressor, putting upholstery pieces together using staples requires a dedicated space. 

For the record, I am not a fan of securing fabric covers to a furniture frame with staples. I want my furniture to last for a long time, so I always invest in high-end decor fabric,.
Firstly I don't want to put lots of thick staples in my high end fabric - I'd feel as if I was wasting money.
Secondly but more importantly, dust makes me sneeze A LOT, so all of my furniture covers are fitted with zips and Velcro closures for easy removal and replacement. 
large stapler
Covers can be washed or sent to the dry cleaners as often as is needed. Having said all of that, staplers do play an important, albeit temporary role in my home decor projects.

Storage for Decor Fabric and Upholstery Tools

From experience, I've found that with any home decor project, 2 things are bound to keep you motivated and engaged in your pursuit.
storage
1) A clear vision for success: what are you trying to create and what will it look and feel like when you've finished? Seriously - don't wing it or play it by ear. Know where you are going with your project and go there, no detours.
2) A clean and clutter-free craft space and a method for keeping it that way. This is the key to staying focused on success and allowing the creative genius in you to work in a tidy and calm environment.
Storage Boxes and storage drawers are indespensible items for storing your fabric and 'in progress' pattern pieces.  Labelling your boxes allows you to organise and find you work quickly and easily.

Keep Your Craft Room Clean and Tidy

Hand-crafted home décor gives you a sense of pride. It's difficult not to smile each time you sit on something made by your own hands.
But creating , especially cutting and shaping your fabric, is very messy work.

Slithers of paper and fabric, not to mention fluff and fibres, makes for an untidy work area. 
It's worth keeping a small vacuum cleaner around to stay on top of the bits of fabric and paper flying everywhere.
cleaning items
A long handled broom and pan set,  micro-fibre cloths and anti-bacterial wipes, can also help you to keep your craft space clean, tidy and organised.

Embellishments

There are plenty of ways to brand or personalise your upholstery and soft-furnishings, the easiest of which is to use embellishments. Lets look at some of the more common ways.

Beading

Intricate beading designs can be stitched (I don't advocate gluing) on to decor fabric which can then be used to make soft furnishings like curtains, tie-backs and throw cushions etc.

Beading is quite fiddly and requires a steady. even, felt surface to keep the beads clean and still, while you work.
beads

Applique

I think of applique as basic mixed media. My favourite form of applique involves tracing and cutting out a design from one type of fabric, like jet black suede, and stitching (I am not a fan of gluing) on top of another type of fabric, like black satin cushion covers.
appliqued green clover on black background
While stitching the two types of fabric together can be done on the go, the initial process of tracing and cutting out the applique design will require your full attention.
You'll probably need scissors, rotary cutter, pens, pencils, a firm flat surface and self-healing cutting mat. 
Another form of applique requires a hot iron, this is used to heat up and  stick iron-on transfers to the main fabric.

Thread Painting and Embroidery

This is my favourite method to brand and customise fabric decor and also the method that I use the most. Thread painting and embroidery add a unique quality to upholstery projects. You can literally depict any design for example:

Typography:

personal messages, poem verses, well-known phrases, a signature or initials.

Images:

silhouettes, photographs of loved ones or celebrities, sky-lines, cartoon characters, scenes from a movie, landscapes and seascapes, animals,
love embroidered with red thread on taupe background
The prep stage for thread work involves designing and tracing, so you'll need shapes or stencils to trace around, pens or pencils, chalk, fabric weights and perhaps a light-box.
Drawing your final design onto your decor fabric requires a steady, even surface and good lighting.
pink floss and ribbon
You can easily personalise your decor fabric with bespoke designs. You can embroider, or thread paint designs for cushions, tiebacks and table runners.
Simply lay the stencil on your fabric and trace through the spaces in the plastic, then sew over the design with your choice of threads, floss or ribbon.
On the go work is easy to prep for: you'll need a needle wallet with threaded needles, sharp embroidery scissors and an embroidery hoop to steady your fabric while you sew. All of these items should fit neatly into your hand-stitcher's go bag.

Buttons, Piping and frills

You may wish to adorn your throw cushions, seat cushions and ottomans with additions such as piping, buttons or frills. For this, you'll need home decor tools like a rotary cutter, a self-healing mat, a ruler, and pins.
You'll definitely need an even, flat surface to create the piping on and good lighting. I would do both the prep work and the final hand-stitching stage in my craft space.
button cushions

Tassels

tassels on orange cushions
These types of embellishment usually come already made, from haberdashery and craft supply shops.

Attaching them to your soft furnishings is simple and usually involves just a few stitches. This stage can be done in your craft space, or while you are on the move.

Finishing stages for DIY Upholstery Project

Attaching cover to frame

If you are using the Furnished by Hand method, you'll have your essential tools neatly tucked away in your go bag,  allowing you to hand-stitch your smaller pieces while you're out and about.
Depending on your project, the finishing touches may need to be completed in your craft space.  Let's say, for example, that you've sewn your pattern pieces on the go, the finishing stages may require you to attach a cover to a frame (i.e an armchair cover). This will be done in your craft space.
chair cross section

Stuff Cushion Covers

cushion pad and cushion cover
Seat and throw cushion pattern pieces, zip plaques and lining can be sewn on the go. The stuffing and padding for the cushions will be stored in your craft space until the covers are completed,  and then used to fill the fabric covers.

Hem Curtains

Remember the palatial mansion-style curtains we talked about earlier?
To ensure that you create a straight and professional hem line, the curtains need to be hung up in their final location.
The curtain hem can then be pinned at the level where the fabric meets the floor before it is sewn into place. This helps to ensure that the fabric flows and falls in a way that looks uniform and even.
Handcrafting home decor involves a lot of different activities, some of which must be done in your personal haven (craft space), while many can be done almost anywhere else,  you could take your project on a cruise, on the beach or to the local park - it really doesn't matter where.  The key is to have the tools that you, in good working order and easily accessible.
Over to you:  What other essential Hand Craft Tools for DIY handmade home decor would you add to the list?

Please leave a comment and let us know.

Leave a Reply

Your email address will not be published. Required fields are marked *

cross