So the Window Box Seat Cushions got a full revamp, actually the entire tiny living room got a quick make-over: Full Declutter, a thorough Clean and Sanding, then a good seal and paint. You can see the process here.
The Emergency Seating Arrangement.
Do you remember the 'Window Box Seat' project? Well, that was an unplanned project where we created emergency seating for an impromptu visit from my in-laws. That was a long time ago. This time, the revamp was planned and budgeted for.
DIY Home Decor Objective
We wanted to refresh and update the living room walls, ceiling, doors, furnishings. We didn't want to 'add' to what was already there, because lets face it, the space is tiny and even a tv looks overwhelming. In the past, we've had to be specific about our choice of 'knicknacks', plants and wall art.
Time:
The entire process took about 4 weeks to achieve and starts here.
Inspiration:
The movie: The King And I (Yul Brynner and Deborah Kerr).
Draped and gathered, rather than Measured and squared
Pros:
We got 'brand new' bespoke furniture in our choice of fabric, colour, shape and style !!
Cons:
The decor fabric covers for the old furnishings no longer fit the 'new furniture' so they had to go. I'm thinking about using them as 'new' cushion pad covers.
I Cheated:
Not everything in the room was hand-made. We bought the curtains and rugs to complete the look. BUT....We have every intention of making bespoke curtains and rugs too...stay tuned for upcoming tutorials.
The Scene
Once the decluttering process was over with, we could see the room more clearly...it still looked like a box. The next step was deciding on the ambience. Because of the size of the room, we always aim to create a fresh and open atmosphere with as much light as possible. With that in mind, we painted the entire room white.
Applying white paint to the largest surfaces, always helps to achieve this brightening effect in our space. At one point I was tempted to paint the floors white too. You can read more about the paint and prep process here.
Home Decor Ornament Selection
As usual, we opted to keep our Home Decor Ornaments to a minimum (read none).
In tiny spaces like ours, even a non-intrusive candle-holder can look junky or just 'too much'. Unless the ornaments are (very) functional, then they are out - the same goes for plants in ornamental plant pots.
Wall Art however, is always a good idea. I personally think that you can always find a beautiful piece of wall art to complement your home decor. We're still undecided about which wall and what art we want to put on it, but we'll keep you updated.
Decor Fabric Choices
Often, I get my home decor inspiration from publications. I also love to watch epic movies, with vast and extravagant film sets, where characters are adorned in lavish costumes. I take mental snapshots of colours and placing. This Window Box Seat Revamp project, balanced the essence of African, Persian and Tuscan styles.
We watched the movie 'The King & I' the same day that we bought our decor fabric, so perhaps the textures we saw in the movie influenced some of fabric choices.
The Stages
This was my pet project - an update of the first window box seat project. Like all good projects, there were a number of stages to complete. Please allow me to walk you through them.
Enjoy!
Stage 1
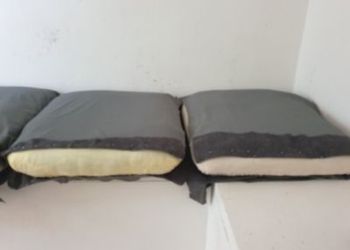
The polyfoam for each cushion was still in good condition, all I had to do was remove the old Dacron. I then re-padded each cushion on all sides with cotton and reclaimed wool from a conservation far. I then wrapped the lot in 4 inchs of Dacron.
I like to use ALL my fabric scraps, rather than chuck them out. I used my large pile of scraps from old projects, to line each cushion. I placed scraps of satin, lycra, muslin and dress fabric side by side, then pinned and stitched them together.
It wasn't a tidy result, but I was very pleased that the lining made it much easier to slide the cushions inside their covers. You can watch the process here.
Stage 2
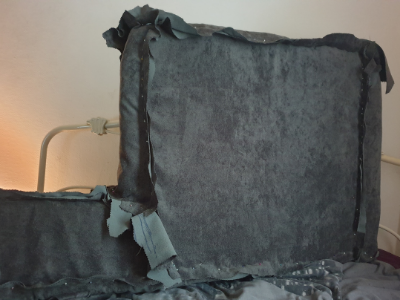
The project involved more than just sewing - there was lots of dusty sanding going on during the day. The cushions were kept on the bed and then wrapped up at night in the living room. Always keep cushion pads wrapped up so that they don't absorb hair and dust from the air.
Stage 3
This is a measure by eye project, so there were no templates or patterns. I wanted to drape and pin the decor fabric. I'll show you the error I made so stay tuned.
Here I have decided that the front, top and bottom panel will be formed by one large, continuous piece of fabric. The sides and back were formed by one continuous strip that has a zip fitted into it.
Stage 4
Long story (a lot longer than I would like to admit), but I made a mistake with the seat cushion cover fabric. The cushion pads are not symetrical, so there was no way that I could drape and sew the covers on the reverse.
I should have placed the fabric with the right side facing upwards. This was a costly mistake, as I cut a lot of fabric before I realised what I had done wrong. Here, I am about to attach the long strip to form the border around the cushion seat cover.
Stage 5
The seat cushions were wonderfully juicy, really comfortable to sit on and the bouyouncy was incredible.
I was still under the illusion that my project was on track, so I forged ahead to cut out, and pad an L Shaped cushion seat, for the short tail of the Window Box Seat.
Stage 6
I'm so excited at this point, I feel the wind beneath my wings, everything is coming together. It was time for bed, but I was on a roll. I roughly cut out some polyfoam for the backrest, and padded it with wool.
Stage 7
Okay, at this point I realised something was wrong. I flipped a cushion cover and did a fitting over its cushion pad...it didn't fit. Here, I've cut the excess fabric off to reaccess the issue. I have pinned a piece of fabric over each cushion pad and pinned the margin back.
I knew that this method of working on asymetical cushion pads, with the right side of the fabric facing downwards, was not going to work. I won't make this mistake again.
Stage 8
Now that I have figured it out, I've changed my method and turned the fabric, so that the right side of the fabric is facing outwards. I inserted a closure for easy removal, cleaning and repair. Here, you can see the zipper panel on the side of the L shaped cushion.
Stage 9
The sides of my seat cushion pads don't have solid straight edges - they are more nugget shaped than cube-shaped.
I had to compromise between sewing straight lines and sewing on the edges.
This pinning method, helped to ensure that I had a straight 'edge to draw my stitch guideline on the reverse of the fabric.
I went through the zip closure and drew stitch guidelines on the reverse of the fabric, at the point where the pins joined them together. I then removed the pins and placed the fabric pieces with the right sides facing each other. I re-pinned the fabric on the reverse side, along the stitch guides that I had made.
There was a lot of backstitching involved in the process, but It wasn't difficult to do. The sewing part took a long time, but didn't involve special stitches.
Even when I made mistakes during the process, the fix was obvious and only took a little time to do.
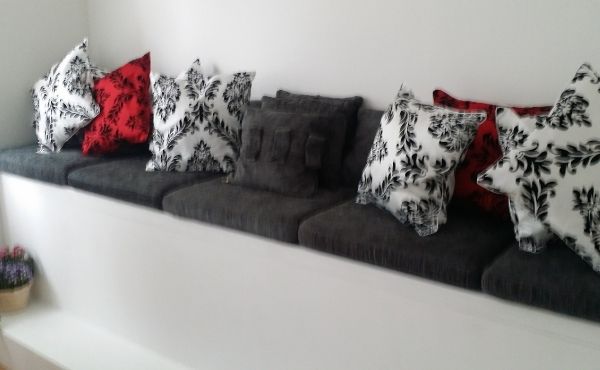
As you can see, I completed my project by dressing the the sofa seats with hand-stitched scatter cushions.
To provide the best experiences, we use technologies like cookies to store and/or access device information. Consenting to these technologies will allow us to process data such as browsing behavior or unique IDs on this site. Not consenting or withdrawing consent, may adversely affect certain features and functions.
Functional
Always active
The technical storage or access is strictly necessary for the legitimate purpose of enabling the use of a specific service explicitly requested by the subscriber or user, or for the sole purpose of carrying out the transmission of a communication over an electronic communications network.
Preferences
The technical storage or access is necessary for the legitimate purpose of storing preferences that are not requested by the subscriber or user.
Statistics
The technical storage or access that is used exclusively for statistical purposes.The technical storage or access that is used exclusively for anonymous statistical purposes. Without a subpoena, voluntary compliance on the part of your Internet Service Provider, or additional records from a third party, information stored or retrieved for this purpose alone cannot usually be used to identify you.
Marketing
The technical storage or access is required to create user profiles to send advertising, or to track the user on a website or across several websites for similar marketing purposes.