Furnished By Hand

9 Hacks for Elegant DIY Home Decor and Upholstery

We'll assume that you’d rather not have furnishings that look homemade, even if they are .
Have you ever watched a DIY furnishing tutorial on YouTube, that made the entire process look do-able in under 30 minutes? But when you had a go, yours didn't look quite like theirs?
I have.
I've said to myself,  ‘Looks easy enough, and if it isn't, then I'll figure it out’.  That may sound like a plan, but it only works if we understand the 'facts'....well, the facts according To Furnished By Hand:)

Hack 1 - Thin or Weak Fabrics 

Scatter and Bolster Cushion Covers

In at Number 1 are thin, weak and shiny fabrics.  Forget  what you’ve seen in those tutorials, these materials are NOT a good choice for Beginner’s DIY Cushion Covers.
Why?
Ok, these fabrics are fine for a trial run, just not for the main project. The covers will look good after you've made them, but not so great after they have been filled.  That's because thin fabrics tend to make newbie mishaps more obvious, i.e, incorrect measurements, and wonky stitching.
beading
sheet, shirt or dress cotton fabric
beading
all sheer fabrics
beading
satin and other shiny fabrics
beading
woollen and other loose weaves
beading
muslin

Seat Cushions and Chair Covers

Thin or weak fabric may look good in the minutes after you’ve sewn them, but once several seats have been had, the cushions will begin to look ‘newbie-fied’.
Also,  cushion covers will need to be cleaned, which requires pulling the padding out and pushing it back in again.
worn out blue sofa
During the cleaning and maintenance process, the seams are stretched and put under a lot of stress. 
Using thinner or lower quality fabrics for your DIY Seat Cushion Covers, the chances are that your stitches will loosen, the fabric will fray, discolor, stretch and loose shape.

Hack 2 - Piled fabrics

Fabrics that have a pile, like Decor suede or velvet , can make beautifully sumptuous furnishings and infuse an element of stylish elegance into a room.  However, these fabrics will show lumps and bumps if, for example, the seat or scatter cushion is unevenly padded. This will give it an unwanted homemade appearance.
These fabrics often have a directional pile.  This means that if you sew two panels with the pile going in opposite directions, you will either need to start again or put up with furniture that looks both homemade and amateurish.
Furniture  covers that are made of a piled fabric, will benefit from a lining layer, to help soften the look of uneven cushion padding.
While inaccurate stitches can often be hidden under a long pile, a shorter pile requires close, even stitches that give the furnishings a tidy and uniform  appearance.  These fabrics often have a directional pile. This means that if you sew two panels with the pile going in opposite directions, you will either need to start again or put up with furniture that looks both homemade and a bit amateurish.

Hack 3 - Embellishments

Certain types of furnishing embellishments are thought to be a bit outdated. 
However these styles often pop-up in tutorials and sewing books, to add interest to cushion, curtain and pillow designs.
Newbie stitchers may find it easier to steer clear of these embellishments, especially in starter projects..

Hack 4 – Stitch Guides

I wish I had started my sewing journey here – in m opinion this is actually the second most important tip.  Do you remember all those sewing tutorials that teach you how to sew in a straight line?
Exactly!!
I had’t learnt that skill since GCSE ‘Home Economics’.  Seriously, no amount of expensive sewing machines, knowing how to make fancy patterns or cramming sewing terminology, will make up for the skill of sewing accurate, straight seams and pivoting with accuracy a the corners.
Let’s assume that we don’t have the patience to perfect that skill right now.
Instead :
Create each Pattern Piece as if it is a picture in a frame, by drawing on stitch guidelines.
Make Each Pattern Piece into a picture with a frame by drawing on stitch guidelines.
pattern piece with picture frame seam allowance
The fabric inside the stitch guide line represents the picture and the fabric outside the stitch guide line represents the frame or 'seam allowance' - this is the area where you can make mistakes, do wonky sewing, make notes or make snips for sewing around curves.
With a stitch guideline there is less room for sewing errors. You’re more likely to feel comfortable enough to sew at your own pace rather than racing ahead to ‘just get it over and done with’. Your DIY project will appear more professional and less homemade when you feel comfortable and in control of your project.

Hack 5 - Use Good Quality Upholstery Fabric

It is better and easier to use a heavy and tightly woven upholstery fabric for most furnishing projects, especially if they are 'high-traffic' furnishings like seat and cushion covers.
This type of fabric will hold it’s shape more easily, will last longer and will not require regular ironing and smoothing.  Using a Good Quality Upholstery fabric guarantees more solid seams and sharper, easier-to-fill corners.
Early 20th Century bench cushion
For example a seat cushion will hold its shape even after several seats have been had, and will also withstand the stress of regular cleaning better than lower quality fabrics.
Here is a good example: It is a basic hand-stitched seat cushion from the early 20th Century.   It is a bit grubby and has a tear or two, but the basic wadding and the good quality fabric used to create it, have withstood the test of time: that’s over 100 years of seat service. A lower quality fabric would not have lasted half as well.

Hack 6 - Press or Iron the Seams

I used to feel this was a tedious, off-putting task and honesty I still feel that way, however I wouldn’t dream of skipping this step.
To do this, fold and iron the ‘frame’, so that the stitch guideline sits in the 'valley' of the fold. 
This helps to place the stitches in exactly the right place and achieve very clean stitch lines.
Unfortunately I didn’t iron anything on my first window seat project as I felt I didn’t have the time.

Hack 7 - Perfect the Corners

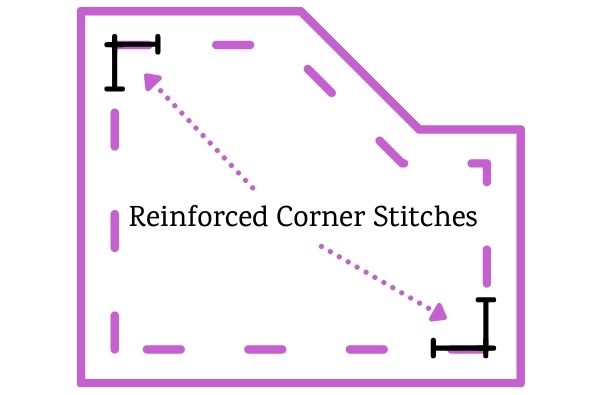
Double Stitching in The corners
Whether it's curtains or cushions, the corners must be clear and sharp. Professionally made furnishings, always have perfectly finished corners. They're never lumpy nor are they curved when they are supposed to be straight or vice versa.  For squared or rectangle seating cushion covers, the stitches are sewn all the way up to the corners to create a very sharp point.
Get the same look for your project and ensure that you create sharp right angles in the corners of your 'frame’.
Emphasis the point by doubling the stitches in the corners.
After sewing the cushion covers, iron them first before turning them the right way around. Make sure that the corners are completely turned out all the way and the pressed flat again to create a sharp point.  If necessary, use additional padding so that the corners are self-supporting and able to hold their shape.
The padding you use will depend on the cushion type. 
You'll need to make considerations for cushion-fights, cushion throwing and climbing toddlers (and adults). 
Padding should always provide comfort and support, and be durable and easy to keep clean.
Whichever padding you opt for, the aim is always to achieve a completely smooth and evenly filled-out finish.
Cushions last longer with a dense inner padding like memory foam or High Density Poly-Foam and a soft outer wadding like Dacron or cotton.
Take extra care with this stage of your project.
One of the main reasons we marvel at expensive living room sets in interior design magazines, is because they look smooth, substantial,  strong and uniform.
This has a lot to do with the way the seat and scatter cushions are filled.

So, there you have it

Following these tips will certainly help your DIY upholstery and Soft Furnishing Projects to appear more professionally crafted and will also help them to last longer too.
You can create very beautiful soft furnishings and upholstery with good quality fabric and smooth dense padding.  Even if your platform is nothing more than a (very strong) cardboard box; the padding and fabric will create elegant and supportive seat cushions.
Practice over time will certainly make your projects look less homemade while you become more comfortable creating different soft furnishings that suit your style.

Leave a Reply

Your email address will not be published. Required fields are marked *

cross